Friday, July 6, 2018

Big Data Layers, Landscape, and Principles a quick look


This article intends to give you quick yet very solid and useful information about different data layers, big data unified architecture and a few big data design principles.

Extracting valuable, meaningful information (insights) from enormous volumes of data to improve organizational decisions may involve many challenges such as data regulations, interactions with customers, and dealing with legacy systems, disparate data sources, and so on.
Many thanks to many big data scientists and researchers, as they have designed and come up with a unified architectural approach comprised of different layers at different levels so that we can address all those big data challenges faster and more effectively.
The following article mostly is inspired by the book Architectural Patterns and intends to give the readers a quick look at data layers, unified architecture, and data design principles.

Big Data Layers

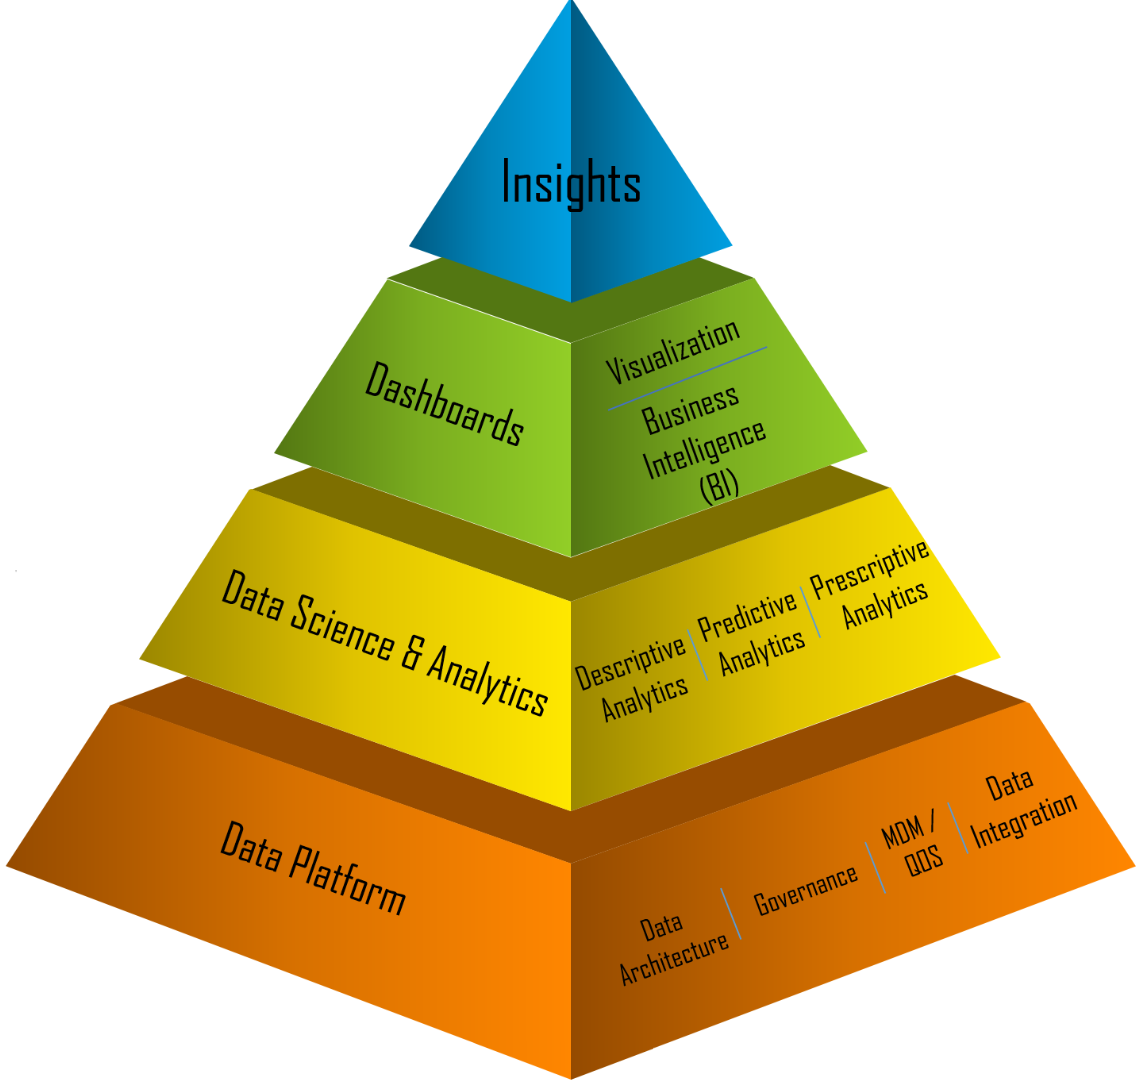
The following pyramid depicts the most common (yet significant) attributes of big data layers and the problem that is addressed in each layer. As you may already know, big data is not a single technology or a framework to solve any set of use cases; it is a set of tools, process, technology, and system infrastructure that helps business to do much smarter analyses and make more intelligent decisions from the massive volume of data traces.Big Data Layers
Big data layers
As you see in the preceding diagram, big data architecture or unified architecture is comprised of several layers and provides a way to organize various components representing unique functions to address distinct problems.

Big Data Landscape

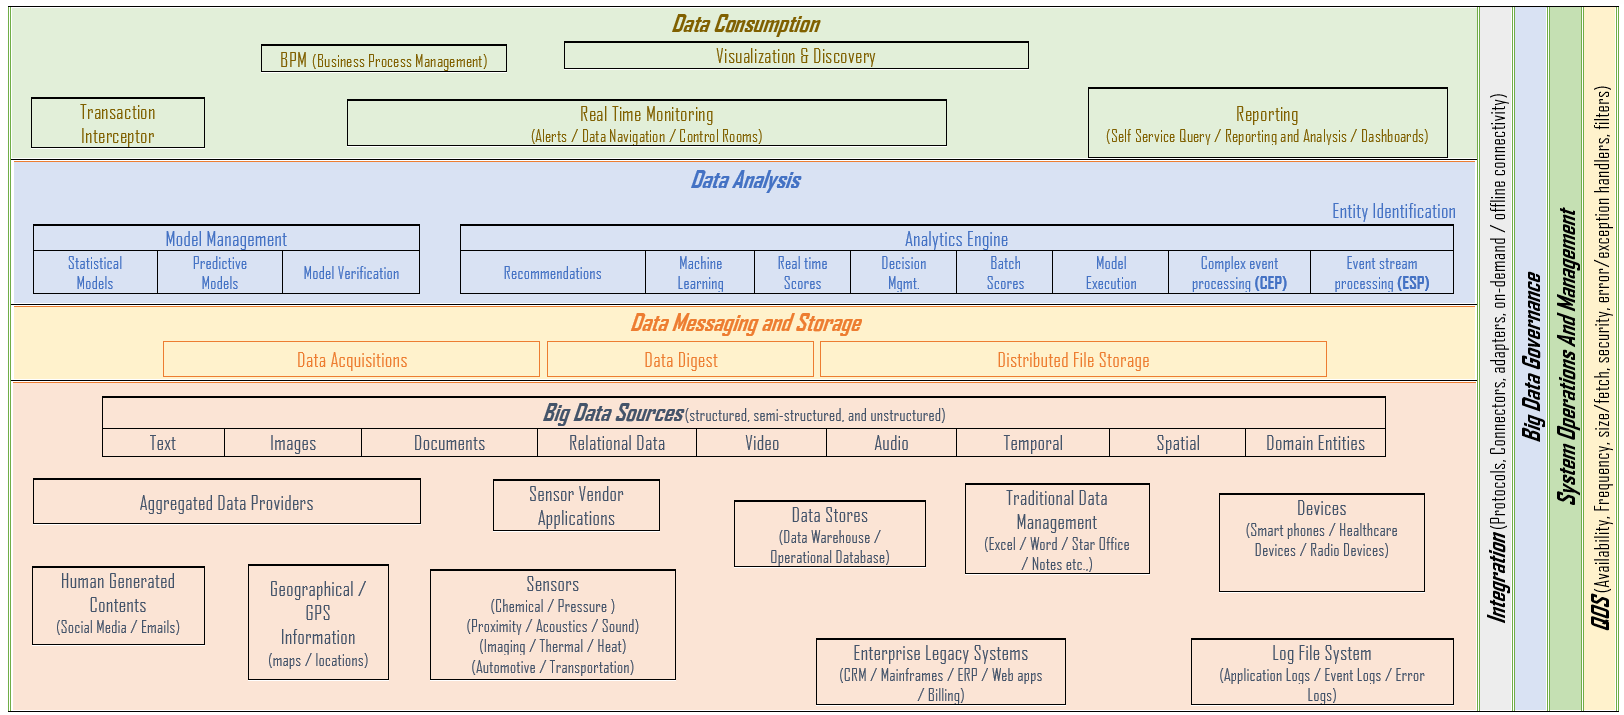
This section will serve as a comprehensive overview of big data concepts and the realization of values in each big data layer that we just discussed.
The following image depicts different levels and layers of the big data landscape:
Big Data Landscape
Big data landscape
Let’s get a brief idea on each layer from the following points:
  • Data sources: Data coming from several channels such as handheld devices, software applications, sensors, legacy databases, and so on.
  • Data messaging and store: Acquire data from the data sources and consider data compliance and storage formatting.
  • Data analysis: Data model management, analytics engines, and access to data message store.
  • Data consumption: Dashboards, presenting insights, reporting, and so on.

Big Data Architecture Principles

As stated earlier, before we conclude this article, we will list out the following big data architecture principles:
  • Decoupled data bus
    • Right tool usage for the job
    • The data structure, latency, throughput, and access patterns
  • Lambda architecture
    • Immutable logs
    • Batch processing
  • Cloud-based infrastructure
    • System maintenance with low or no admin
    • Cost-effective
I conclude this article with the hope you have an introductory understanding of different data layers, big data unified architecture, and a few big data design principles.

Sunday, February 2, 2014

Convert Java Object to XML and XML to Java Object with XStream

Once I got to deal with an incident that loading a very large data (20 MB+)  from the DB and populate as java object (the java object is of many nested / referenced class) and I need to load that every time I start my server. Though we have a distributed cache in place subsequent load would be very fast however the first time load was taking more than 9 minutes.

I was thinking rather loading from DB on server restart if I could load from the local file!! (as the data in the DB updates less often) that's where I got to learn about the XStream Library and its so simple that I could convert any java object to XML and back.

Here I will show you how easy it is to use the XSteram library

First, let's create a Sample Object (you can use any existing class as well) as follows

SampleObject.java

 public class SampleObject {  
     private String name="Test";  
     private int testInt ;  
     public String getName() {  
         return name;  
     }  
     public void setName(String name) {  
         this.name = name;  
     }  
   public int getTestInt() {  
         return testInt;  
     }  
     public void setTestInt(int testInt) {  
         this.testInt = testInt;  
     }  
 }  

and a helper class for conversion XStreamTranslator.java

 import java.io.File;  
 import java.io.FileReader;  
 import java.io.FileWriter;  
 import java.io.IOException;  
 import java.util.Iterator;  
 import java.util.List;  
 import com.thoughtworks.xstream.XStream;  
 public final class XStreamTranslator {  
     private XStream xstream = null;  
     private XStreamTranslator(){  
         xstream = new XStream();  
         xstream.ignoreUnknownElements();  
     }  
     /**  
      * Convert a any given Object to a XML String  
      * @param object  
      * @return  
      */  
     public String toXMLString(Object object) {  
         return xstream.toXML(object);   
     }  
     /**  
      * Convert given XML to an Object  
      * @param xml  
      * @return  
      */  
     public Object toObject(String xml) {  
         return (Object) xstream.fromXML(xml);  
     }  
     /**  
      * return this class instance  
      * @return  
      */  
     public static XStreamTranslator getInstance(){  
         return new XStreamTranslator();  
     }  
     /**  
      * convert to Object from given File   
      * @param xmlFile  
      * @return  
      * @throws IOException   
      */  
     public Object toObject(File xmlFile) throws IOException {  
         return xstream.fromXML(new FileReader(xmlFile));  
     }  
     /**  
      * create XML file from the given object with custom file name  
      * @param fileName   
      * @param file  
      * @throws IOException   
      */  
     public void toXMLFile(Object objTobeXMLTranslated, String fileName ) throws IOException {  
         FileWriter writer = new FileWriter(fileName);  
         xstream.toXML(objTobeXMLTranslated, writer);  
         writer.close();  
     }  
     public void toXMLFile(Object objTobeXMLTranslated, String fileName, List<String> omitFieldsRegXList) throws IOException {  
         xstreamInitializeSettings(objTobeXMLTranslated, omitFieldsRegXList);  
         toXMLFile(objTobeXMLTranslated, fileName);      
     }      
     /**  
      * @  
      * @param objTobeXMLTranslated  
      */  
     public void xstreamInitializeSettings(Object objTobeXMLTranslated, List<String> omitFieldsRegXList) {  
         if(omitFieldsRegXList != null && omitFieldsRegXList.size() > 0){  
             Iterator<String> itr = omitFieldsRegXList.iterator();  
             while(itr.hasNext()){  
                 String omitEx = itr.next();  
                 xstream.omitField(objTobeXMLTranslated.getClass(), omitEx);  
             }  
         }   
     }  
     /**  
      * create XML file from the given object, file name is generated automatically (class name)  
      * @param objTobeXMLTranslated  
      * @throws IOException  
      * @throws XStreamTranslateException   
      */  
     public void toXMLFile(Object objTobeXMLTranslated) throws IOException {  
         toXMLFile(objTobeXMLTranslated,objTobeXMLTranslated.getClass().getName()+".xml");  
     }  
 }  
few Test cases to verify

 import static org.junit.Assert.assertEquals;  
 import static org.junit.Assert.assertNotNull;  
 import static org.junit.Assert.assertTrue;  
 import java.io.File;  
 import java.io.IOException;  
 import java.util.ArrayList;  
 import java.util.List;  
 import org.apache.commons.io.FileUtils;  
 import org.junit.After;  
 import org.junit.Before;  
 import org.junit.Test;  
 
 public class XStreamTranslatorTest {  
     SampleObject sampleObj;  
     XStreamTranslator xStreamTranslatorInst;  
     /**  
      * @throws java.lang.Exception  
      */  
     @Before  
     public void setUp() throws Exception {  
         sampleObj = new SampleObject();  
         xStreamTranslatorInst = XStreamTranslator.getInstance();  
     }  
     /**  
      * @throws java.lang.Exception  
      */  
     @After  
     public void tearDown() throws Exception {  
     }  
     @Test  
     public void simpleObjectToXMLStringNotNullTest() {  
         String xml = xStreamTranslatorInst.toXMLString(sampleObj);  
         assertNotNull(xml);  
     }  
     @Test  
     public void simpleObjectToXMLStringVerifyTest() {  
         sampleObj.setName("Test");  
         assertEquals("Test",sampleObj.getName());  
         sampleObj.setTestInt(9);  
         assertEquals(9,sampleObj.getTestInt());  
         String xml = xStreamTranslatorInst.toXMLString(sampleObj);  
         String expected = getExpectedStringOutOfSampleObject();  
         assertEquals(expected, xml.replaceAll("[\\n\\s\\t]+", ""));  
     }  
     @Test   
     public void xmlToObjectVerifyTest(){  
         String xml = getExpectedStringOutOfSampleObject();  
         SampleObject sampleObj = (SampleObject) xStreamTranslatorInst.toObject(xml);  
         assertNotNull(sampleObj);  
     }  
     @Test (expected=IOException.class)  
     public void xmlToAnyObjectFromFileThatNotExists() throws IOException{  
         SampleObject sampleObj = (SampleObject) xStreamTranslatorInst.toObject(new File("C:\\MyHome\\mySampleCodes\\xstream-samples\\src\\test\\resources\\testNoFile.xml"));  
         assertNotNull(sampleObj);  
         assertEquals("somename",sampleObj.getName());  
     }  
     @Test   
     public void xmlToAnyObjectFromFile() throws IOException{  
         SampleObject sampleObj = (SampleObject) xStreamTranslatorInst.toObject(new File("C:\\MyHome\\mySampleCodes\\xstream-samples\\src\\test\\resources\\testSampleObject.xml"));  
         assertNotNull(sampleObj);  
         assertEquals("Test",sampleObj.getName());  
     }      
     @Test   
     public void objToXmlFileTestForNotNull() throws IOException {  
         SampleObject sampleObj = new SampleObject();  
         sampleObj.setName("Test2");  
         assertEquals("Test2",sampleObj.getName());  
         sampleObj.setTestInt(99);  
         assertEquals(99,sampleObj.getTestInt());  
         xStreamTranslatorInst.toXMLFile(sampleObj);  
         File file = new File(sampleObj.getClass().getName()+".xml");  
         assertTrue(file.exists());  
         String sample = FileUtils.readFileToString(file);  
         assertNotNull(sample);  
     }      
     @Test   
     public void objToXmlFileCreate() throws IOException {  
         SampleObject sampleObj = new SampleObject();  
         sampleObj.setName("Test2");  
         assertEquals("Test2",sampleObj.getName());  
         sampleObj.setTestInt(99);  
         assertEquals(99,sampleObj.getTestInt());  
         xStreamTranslatorInst.toXMLFile(sampleObj);  
         File file = new File(sampleObj.getClass().getName()+".xml");  
         assertTrue(file.exists());  
         String sample = FileUtils.readFileToString(file);  
         assertNotNull(sample);  
         assertEquals(getExpectedStringOutOfSampleObject2(),sample.replaceAll("[\\n\\s\\t]+", ""));  
     }  
     private String getExpectedStringOutOfSampleObject() {  
         return "<com.mysamples.thoughtworks.xstream.SampleObject><name>Test</name><testInt>9</testInt></com.mysamples.thoughtworks.xstream.SampleObject>";  
     }  
     private String getExpectedStringOutOfSampleObject2() {  
         return "<com.mysamples.thoughtworks.xstream.SampleObject><name>Test2</name><testInt>99</testInt></com.mysamples.thoughtworks.xstream.SampleObject>";  
     }      
 }  
Add the following dependency in your pom.xml (dependencies section)
         <dependency>  
             <groupId>com.thoughtworks.xstream</groupId>  
             <artifactId>xstream</artifactId>  
             <version>1.4.5</version>  
         </dependency>  
Run your test cases and see for yourself how the XML got generated from the sample object and back to SampleObject.
following is the sample XML that I have.
 <com.mysamples.thoughtworks.xstream.SampleObject>  
  <name>Test2</name>  
  <testInt>99</testInt>  
 </com.mysamples.thoughtworks.xstream.SampleObject>  
Sunday, December 15, 2013

Static code analysis and reporting for your Java projects with Sonar - Integrate with your Eclipse (How To)

SONAR REPORTING AND ANALYSIS FOR YOUR PROJECTS

Summary

This Document tries to help you out to install sonar, analyze your project with your sonar installation, integrate with your Eclipse, clean up violations dynamically and practice better coding.

Table of Contents

  1. Sonar Installation
  2. Download Sonar
  3. Unzip and Install
  4. Run Sonar
  5. Sonar Console
  6. Access your Sonar installation
  7. Generate Sonar Report
  8. Update your POM with SONAR configurations
  9. Example
  10. Access your project in Sonar
  11. Integrate SONAR with Eclipse
  12. Eclipse Sonar Plug-In Installation
  13. Eclipse Integration (To install this plugin in the Eclipse IDE)  - With Eclipse Market Place
  14. Eclipse Integration (To install this plugin in the Eclipse IDE)  - With Eclipse Software Update
  15. Configure Sonar in your Eclipse
  16. Link your project for the first time
  17. Analyze and clean up the code violations
  18. Run Sonar Analysis in Local

Sonar Installation

Download Sonar

Download the sonar here http://dist.sonar.codehaus.org/sonar-3.5.1.zip  and unzip the download to your favorite folder

Unzip and Install

After Unzip you will see folder structure would look something like as follows.. 

Figure 1 – Sonar Dir Structure

Run Sonar

Depends on your OS, you need to run the executable , for an instance if you are running linux-x86 and 64 bit, then you need to run start.sh

Figure 2 – Run Sonar

Sonar Console

After you start the sonar you will see some info as follows after you run the sonar

Figure 3 - Sonar Console

Access your Sonar installation

Now you can browse your sonar installation http:localhost:9000

Generate Sonar Report

Update your POM with SONAR configurations

After we have the sonar installed, we can generate the reports for any maven project, by adding the following lines in your project pom.xml (sonar hosts in your properties section)

Figure 4 - POM XML for Sonar Generation


Example

Let’s take an example of project-common; do the following steps
·         Checkout the latest code from repository to your work space
·         Do mvn clean install
·         Modify your pom.xml (pom.xml) to have the following under properties section
·         <sonar.host.url> http://localhost:9000/ </sonar.host.url>
·         Save the file
·         Do mvn sonar:sonar in your command / terminal

·         You will see some messages as following.

Figure 5 - Sonar report Generation - I

Note: And after few minutes (depends on the size of the modules the sonar report would even take longer)

Figure 6 - Sonar Report Generation - II

Finally you would see the following that indicates the sonar reporting is completed..

Figure 7 - Sonar Report Generation Successful


Access your project in Sonar

Now go to you http://localhost:9000 you would see the project report that you ran for

Figure 8 - Sonar Project Report at your Local 

Integrate SONAR with Eclipse

Eclipse Sonar Plug-In Installation

Eclipse Integration (To install this plugin in the Eclipse IDE)  - With Eclipse Market Place

Figure 9 - Sonar Eclipse Plug-in Install (Market Place)


Figure 10 - Sonar Eclipse Plug-in Install (Market Place) II

Eclipse Integration (To install this plugin in the Eclipse IDE)  - With Eclipse Software Update

Go to Help > Install New Software... This should display the Install dialog box.
Paste the Update Site URL (http://dist.sonar-ide.codehaus.org/eclipse/) into the field Work with and press Enter. This should display the list of available plugins and components:

Figure 11- Sonar Eclipse Plug-in Install (With Install New Software Menu)


Choose Sonar Java, follow the steps and install the plugin
Note: Please make sure the project that you want to associate with sonar has already analyzed in your sonar installation


Configure Sonar in your Eclipse

Configure your local/remote sonar in your Eclipse
Go to Window > Preferences > Sonar > Servers.
Sonar Eclipse is pre-configured to access a local Sonar server listening on http://localhost:9000/. You can edit this server, delete it or add a new one.

Figure 12 - Configure Sonar Server in Eclipse

Link your project for the first time

Once the Sonar server is defined, the next step is to link your Eclipse projects with projects defined and analyzed on this Sonar server.
To do so, right-click on the project in the Project Explorer, and then Configure > Associate with Sonar...:

Figure 13 - Configure / Associate your Eclipse Project with Sonar


In the Sonar project text field, start typing the name of the project and select it in the list box:

Figure 14 - Associate your Eclipse Project with Sonar II


Click Finish. Your project is now associated to one analyzed on your Sonar server.

Analyze and clean up the code violations

Do local analysis and clean the violations

Figure 15 - Configure Modules


Figure 16 - configure sonar modules from Eclipse

Note
Please make sure you have started your local sonar server (as described in Run sonar section) otherwise you would not able to see the right sonar project that you intend to configure


Run Sonar Analysis in Local

Figure 17.a – Set Sonar Analysis on Local Mode


Figure 17:b - Run Sonar Analysis on Local


Figure 18 - sonar violation analysis console


Figure 19 - Sonar violation analysis console II


Figure 20 - Sonar violations Markers


-- End  of Document --


--Happy Clean Coding

Saturday, December 7, 2013

compare formatted XML with unformated XML in unit test cases


How do we compare the XML in our unit test cases... 

For an instance, say

expected = "<com.mysamples.thoughtworks.xstream.SampleObject><name>Test</name><testInt>9</testInt></com.mysamples.thoughtworks.xstream.SampleObject>"

actual = "<com.mysamples.thoughtworks.xstream.SampleObject>
  <name>Test</name>
  <testInt>9</testInt>
</com.mysamples.thoughtworks.xstream.SampleObject>"

(the above actual is formatted xml)

then -> assertEqual (expected,actual) will result in FAILED test case,,

how do we correct this..
with simple regex make our unit testcases compare and pass

xml.replaceAll("[\\n\\s\\t]+", "")

//sample Snippet
@Test
public void simpleObjectToXMLStringVerifyTest() {
ObjectToXML obj = new ObjectToXML();
String xml = obj.toXMLString(sampleObj);
String expected = getExpectedStringOutOfSampleObject();
assertEquals(expected, xml.replaceAll("[\\n\\s\\t]+", ""));
}